
Tools
Changing the running mode of Dameware Remote Support and Dameware Mini Remote Control from Central Server to Standalone and vice versa
This article shows on how to change or switch the running mode from Centralized installation to Stand-alone installation and vice versa.
First published date
7/18/2019 7:02 PM
Last published date
3/17/2023 9:21 AM
Overview
Dameware Remote Support and Dameware Mini Remote Control use the same installer for both the Centralized mode installation and Stand-Alone installation.
The only difference is upon running the installer in which it will ask what installation mode to use:
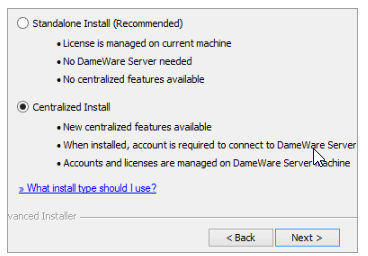
The only difference is upon running the installer in which it will ask what installation mode to use:
- Stand-Alone Install is for installation with does not need a Dameware Central Server and a license requires per-machine installation.
- Centralized Install is for centralized management of licenses in which the license key is activated only on the Dameware Central Server and the client just needs to authenticate to the Central Server to use.
Product section
Dameware Remote Support & Mini Remote Control
Cause
NA
Resolution
- Launch Dameware Remote Support or Dameware Mini Remote Control.
- Click Help
- Select Change Running Mode from Central Server to Console Only or Change Running Mode from Console only to Central Server depending on your current installation.
- In alternative to Step 1,2,3, you can also go to the installation path of your Dameware application and look for the SolarWinds.RunningModeUtility.exe file and run it as an admin.
- For DRS: C:\Program Files (x86)\SolarWinds\Dameware Remote Support\SolarWinds.RunningModeUtility.exe
- For DMRC 64-bit: C:\Program Files\SolarWinds\Dameware Mini Remote Control x64\SolarWinds.RunningModeUtility.exe
- In alternative to Step 1,2,3, you can also go to the installation path of your Dameware application and look for the SolarWinds.RunningModeUtility.exe file and run it as an admin.
- On the "Change Running Mode Utility" window, select which mode you wanted to use.
- For Centralized to Stand-alone, select Console Only Mode
- Click the "Click here to purchase a license or enter a license activation key"
- Select Enter Licensing Information
- On the Activate DRS Window, select the option above for Online Activation
- Log in to your SolarWinds Customer Portal > Licenses > Manager Licenses
- Look for "Dameware Remote Support [Formerly Dameware NT Utilities] Per Seat License"
- Copy the license key
- Input it on the Activate DRS window
- Complete the license activation process
- For an online registration error message, follow this article, restart your machine, and retry the whole process
- Click the "Click here to purchase a license or enter a license activation key"
- For Stand-alone to Centralized, select Dameware Central Server Mode
- Input your Dameware Central Server's IP Address or Host Name
- The default Port is 6133
- For Centralized to Stand-alone, select Console Only Mode
- Complete switching running mode by clicking Submit and relaunching your Dameware.