
Security Compliance
Understanding syslog in SEM
General information about syslog service in Security Event Manager (formerly Log & Event Manager).
First published date
11/29/2018 10:37 PM
Last published date
3/14/2022 6:10 AM
Overview
This KB article provides general information about how syslog processing works in SEM. Although SEM can receive SNMP traps on port 162, syslog is far more common. SEM utilizes Syslog-ng as the syslog daemon, receiving data from network devices such as Routers/Firewall/ etc on UDP port 514.
UDP protocol is common for syslog because of the speed and efficiency. However, we are starting to see Syslog being used on TCP for secure Syslog forwarding.
Product section
Security Event Manager
Cause
NA
Resolution
This KB article provides general information about how syslog processing works in SEM. Although SEM can receive SNMP traps on port 162, syslog is far more common. SEM utilizes Syslog-ng as the syslog service/daemon, receiving data from network devices such as Routers/Firewall/etc. on UDP port 514.
Background:
UDP protocol is common for syslog because of the speed and efficiency. However, we are starting to see some customers using syslog over TCP for secure Syslog forwarding.
As of release 2019.4 SEM does not yet support encrypted syslog data, we do have plans to add support for this in future versions. Please register your voice by logging a support ticket with SolarWinds Support.
Overview of Syslog parsing:
The easiest way to think of syslog in SEM, is to focus on the syslog area of the SEM as the destination. Even though we use syslog terms like 'local facilities', there is a collection of files (flat files) to collect the syslog data.
So, the sending device defines where to send the syslog data by specifying the values for the following parameters:
The parser separates the data into fields, without changing the actual data.
This process allows creating data to filter out and rules to fire upon this data. This normalized data is then inserted into in the historical Alert database.
Using the GUI-console’s nDepth search feature or the Reports application, you can retrieve historical data. How long the data is stored depends on the Live data storage retention in SEM
Syslog can write to the following files in SEM (other files may be possible):
Local0.log
Local1.log
Local2.log
Local3.log
Local4.log
Local5.log
Local6.log
Local7.log
auth.log
audit.log
cron.log
daemon.log
kern.log
mail.log
syslog.log
user.log
Clearing out syslog data:
In some cases, the amount of syslog data received in SEM can overwhelm the appliance and cause space issues. The common causes we have seen in many customer cases were related to firewall appliances sending verbose logging to SEM.
Let’s consider this scenario:
You have a Cisco ASA firewall device that is configured to send syslog data to Local7.log, and the logging level was set according to Cisco best practices. For example, Critical/Warning.
And your network team recently decided to change that to the Verbose or Debug logging level while troubleshooting a network issue (maybe upon recommendations from Cisco Support).
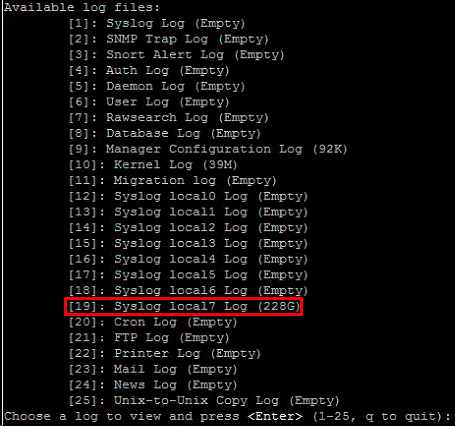
If your Cisco ASA firewall is busy, it can send 100-200 GB a day in one day to SEM without warning. Which in turn results in local7.log file using 200+ GB of disk space on the SEM Logs/Data partition as shown in this example:
If you run into this type of scenario:
Disclaimer: Please note, any content posted herein is provided as a suggestion or recommendation to you for your internal use. This is not part of the SolarWinds software or documentation that you purchased from SolarWinds, and the information set forth herein may come from third parties. Your organization should internally review and assess to what extent, if any, such custom scripts or recommendations will be incorporated into your environment. You elect to use third party content at your own risk, and you will be solely responsible for the incorporation of the same, if any.
Background:
UDP protocol is common for syslog because of the speed and efficiency. However, we are starting to see some customers using syslog over TCP for secure Syslog forwarding.
As of release 2019.4 SEM does not yet support encrypted syslog data, we do have plans to add support for this in future versions. Please register your voice by logging a support ticket with SolarWinds Support.
Overview of Syslog parsing:
The easiest way to think of syslog in SEM, is to focus on the syslog area of the SEM as the destination. Even though we use syslog terms like 'local facilities', there is a collection of files (flat files) to collect the syslog data.
So, the sending device defines where to send the syslog data by specifying the values for the following parameters:
- Destination IP
- UDP/TCP port number
- Destination filename / Facility Name
The parser separates the data into fields, without changing the actual data.
This process allows creating data to filter out and rules to fire upon this data. This normalized data is then inserted into in the historical Alert database.
Using the GUI-console’s nDepth search feature or the Reports application, you can retrieve historical data. How long the data is stored depends on the Live data storage retention in SEM
Syslog can write to the following files in SEM (other files may be possible):
Local0.log
Local1.log
Local2.log
Local3.log
Local4.log
Local5.log
Local6.log
Local7.log
auth.log
audit.log
cron.log
daemon.log
kern.log
mail.log
syslog.log
user.log
Clearing out syslog data:
In some cases, the amount of syslog data received in SEM can overwhelm the appliance and cause space issues. The common causes we have seen in many customer cases were related to firewall appliances sending verbose logging to SEM.
Let’s consider this scenario:
You have a Cisco ASA firewall device that is configured to send syslog data to Local7.log, and the logging level was set according to Cisco best practices. For example, Critical/Warning.
And your network team recently decided to change that to the Verbose or Debug logging level while troubleshooting a network issue (maybe upon recommendations from Cisco Support).
If your Cisco ASA firewall is busy, it can send 100-200 GB a day in one day to SEM without warning. Which in turn results in local7.log file using 200+ GB of disk space on the SEM Logs/Data partition as shown in this example:
If you run into this type of scenario:
- Check with your networking team and change the logging level back to the recommended setting, Critical/Warning, and then ask them to stop logging temporarily.
- If you need the data in this log file, use the CLI command cmc>appliance> exportsyslog to back up to a network share (optional).
- If you do not need this data, then simply delete it via cmc>appliance>clearsyslog, and then follow the steps to clear the logs for the file (number 19 in the example image above).
- syslog-ng on Wikipedia (© 2018 Wikimedia Foundation, Inc. available at https://en.wikipedia.org, obtained on September 17, 2018.)
- syslog-ng Open Source Edition 3.16 - Administration Guide (© 2018 One Identity LLC, available at https://www.syslog-ng.com, obtained on September 17, 2018.)
Disclaimer: Please note, any content posted herein is provided as a suggestion or recommendation to you for your internal use. This is not part of the SolarWinds software or documentation that you purchased from SolarWinds, and the information set forth herein may come from third parties. Your organization should internally review and assess to what extent, if any, such custom scripts or recommendations will be incorporated into your environment. You elect to use third party content at your own risk, and you will be solely responsible for the incorporation of the same, if any.