
Security Compliance
Troubleshoot "Access Denied" errors in Patch Manager
This article describes how to troubleshoot Access Denied error messages that you may encounter while using Solarwinds Patch Manager.
First published date
11/29/2018 10:39 PM
Last published date
11/29/2018 10:39 PM
Overview
This article describes how to troubleshoot Access Denied error messages when trying to connect Patch Manager to a remote computer. These errors occur when deploying updates to remote computers or executing other tasks on a remote computer—for example, when you open Computer Explorer.
Product section
Patch Manager
Cause
- Machine not joined to the domain correctly
- Wrong UN / Password
- Lack of privileges for the account
Resolution
Basic Troubleshooting:
Verify that you can make a WMI connection to the remote computer using wbemtest.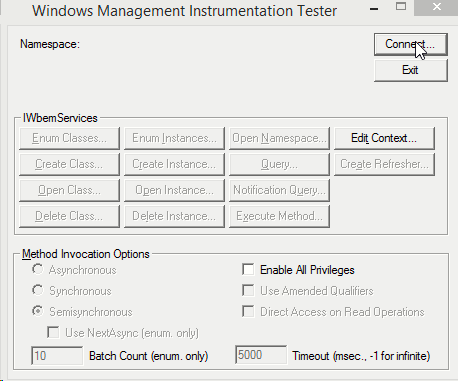
where remoteComputer is the remote computer's name.
Wireshark capture filter on port = 4092 shows below error
527 5.335574 10.177.17.6 10.177.17.15 DCERPC Fault: call_id: 9 ctx_id: 1 status: nca_s_fault_access_denied
- Verify that you can ping the remote computer by hostname and IP address from the Patch Manager server.
- Verify that the user account specified in the error has local admin privileges on the remote computer.
- Verify that you can connect to the remote computer's admin share with the account specified in the error. Open a command prompt with admin rights on the Patch Manager server and run
net use z: \\remoteComputer\admin$ /user:domain\username passwordwhere:
-
- remoteComputer is the remote computer's name.
- domain is the domain for the account specified in the error.
- username is the account specified in the error.
- password is the password for the account specified in the error.
- If the command returns the server is not configured for remote administration, perform the following steps. Otherwise, go to step 7.
- Make sure the File and Print Sharing option is enabled on the remote computer by opening port 445 TCP/UDP on the computer's firewall for communication from the Patch Manager server.
- Make sure the group policy allows your account to access the computer from the network.
- Open the Group Policy editor and go to Computer configuration > Policies > Windows Settings > Security Settings > User Rights Assignment > Access this computer from the network.
- If the command returns Error 1326, configure the remote computer to use the Classic sharing and security model by following these steps:
- Open the computer's Local Security Settings.
- Expand Local Policies, and then select Security Options.
- Select Network access: Sharing and security model for local accounts, and then click Action > Properties.
- Select Classic - local users authenticate as themselves from the menu, and then click OK.
- Re-run the net use command if necessary.
Verify that you can make a WMI connection to the remote computer using wbemtest.
- Launch wbemtest.exe from the Patch Manager server using a command prompt or the Run dialog box.
- Click Connect
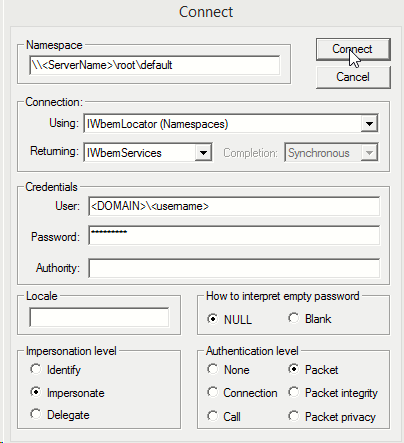
- Complete the Connect window fields.
-
- In the Namespace field, enter:
where remoteComputer is the remote computer's name.
-
- Enter the credentials for the account specified in the error in the Credentials section.
- Click Connect.
- Make sure the firewall on the remote computer is not blocking the connection.
- If you have the permissions, disable the firewall on the remote computer and test the connection again.
- Open the ports required to establish communication from the Patch Manager server to the remote computers.
- Enable DCOM on the remote computer.
- On the remote computer, launch dcomcnfg using a command prompt or the Run dialog box.
- In the navigation pane, expand Component Services > Computer and then click My Computer.
- Click the Action menu, and then select Properties.
- Click the Default Properties tab.
- Select Enable Distributed COM on this computer if necessary.
- Click OK.
- If the remote computer is not running Windows XP, you are finished.
If the remote computer is running Windows XP, disable the simple file sharing option.- Click Start > My Computer on the remote computer.
- Click the Tools menu, and then select Folder Options.
- Click View.
- Under Advanced settings, clear Use simple file sharing (Recommended) at the bottom of the list.
- Click OK
Troubleshoot Access Denied Errors Between Automation And Primary Patch servers
Scenario 1: Access denied errors between Automation server and PASWireshark capture filter on port = 4092 shows below error
527 5.335574 10.177.17.6 10.177.17.15 DCERPC Fault: call_id: 9 ctx_id: 1 status: nca_s_fault_access_denied
- Ensure the connection is being tested from SAS
- And you are using the correct credentials i.e the same credentials used on the Primary Server when launching the PM MMC console.
- The new automation server was not joined to the domain correctly
- Remove and re-join the domain with right credentials
- Re-run the Automation server configuration wizard