
Applications Systems
How to Build an Alert for a New Application
Beginner How-To guide. New to Orion. How to Build an Alert for an Application you just Assigned. New to alerting?
First published date
10/30/2020 1:32 AM
Last published date
10/30/2020 1:32 AM
Overview
If you're new to Orion, please review the free virtual classrooms that are made available in your customer portal.
- Log into the customer portal
- Go to the top bar and hover over 'Education & Training' > Virtual Classrooms
- Products are displayed in the left pane. You can select a product and filter by Live Classes or previously recorded "On Demand Classes"
Product section
Server Application Monitor
Resolution
So you've assigned a new application monitor? Nice work!
Here is how to create an alert for it.
Navigate to the Manage Alerts page.
(Settings > All Settings > Manage Alerts)

You can duplicate off of an existing out-of-the-box alert or create a new alert. Duplicating is easiest but both are simple and similar processes.
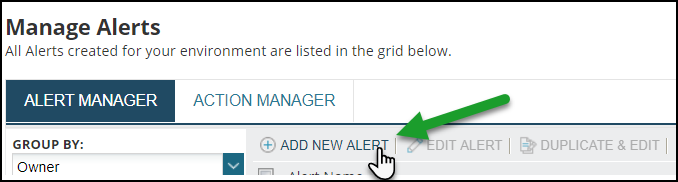
Click 'Add New Alert'
Name your alert and go to the next page. Nothing needs to be touched on the first page other than this, don't be overwhelmed, you can review custom settings later.

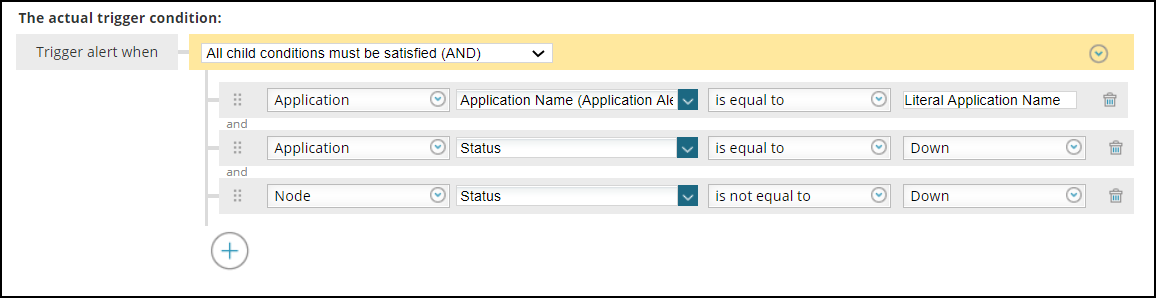
Define your alert conditions. You can be as complex or as simple as you want. The goal is to trigger off the application you have just assigned. Here is a standard recommended set of conditions
Application Name = <Name_of_Application>
Application status = down
*Node/server = up
*This indicates that the application is down but not caused by the node being down. Orion already has out-of-the-box alerts that alert when a node is down. Best practice is to use a node down alert for that situation.
Conditions will appear as so
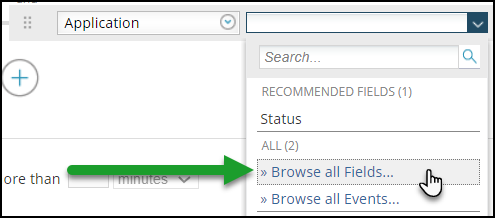
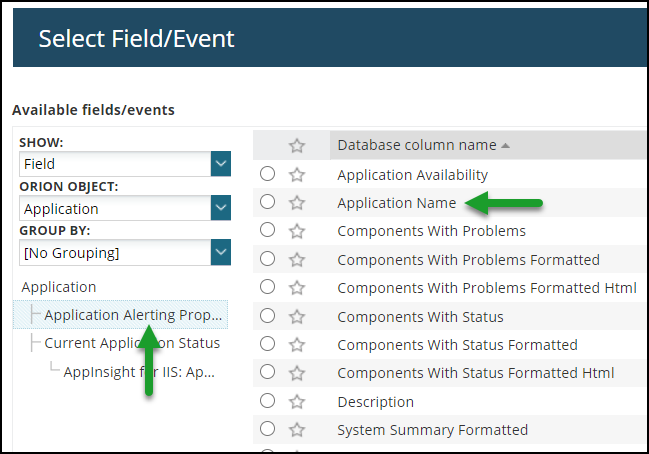
Having trouble finding the Application Name for the conditions? Choose "Browse all fields" then click "Application Alerting Prop..." on the window that appears. Application Name is the second option.
Once the conditions are established. Continue on until you get to the Trigger Actions page. No other changes are required. USE DEFAULTS!
Submit the email action.
Next your way to the last page.
Submit your new alert.
Here is how to create an alert for it.
Navigate to the Manage Alerts page.
(Settings > All Settings > Manage Alerts)
You can duplicate off of an existing out-of-the-box alert or create a new alert. Duplicating is easiest but both are simple and similar processes.
Click 'Add New Alert'
Name your alert and go to the next page. Nothing needs to be touched on the first page other than this, don't be overwhelmed, you can review custom settings later.
Trigger Conditions
Choose "I want to alert on:" ApplicationDefine your alert conditions. You can be as complex or as simple as you want. The goal is to trigger off the application you have just assigned. Here is a standard recommended set of conditions
Application Name = <Name_of_Application>
Application status = down
*Node/server = up
*This indicates that the application is down but not caused by the node being down. Orion already has out-of-the-box alerts that alert when a node is down. Best practice is to use a node down alert for that situation.
Conditions will appear as so
Having trouble finding the Application Name for the conditions? Choose "Browse all fields" then click "Application Alerting Prop..." on the window that appears. Application Name is the second option.
Once the conditions are established. Continue on until you get to the Trigger Actions page. No other changes are required. USE DEFAULTS!
Trigger Actions
Click Add Action and then click Configure Action to send an email - Email action is already selected and the default action.
Naming the action is optional, just ignore this. Now type the recipients of this alert. Click next. You're going to want to change the email subject and body. The default message is useless. Use the below for subject and body.
SUBJECT:
Application (${N=SwisEntity;M=ApplicationAlert.ApplicationName}) on node (${N=SwisEntity;M=Node.Caption}) is in a ${N=SwisEntity;M=ApplicationAlert.ApplicationAvailability} status!
MESSAGE:
Application (${N=SwisEntity;M=ApplicationAlert.ApplicationName}) on node (${N=SwisEntity;M=Node.Caption}) has changed to a ${N=SwisEntity;M=ApplicationAlert.ApplicationAvailability} status! Investigate the components below:
${N=SwisEntity;M=ApplicationAlert.ComponentsWithProblemsFormatted}

Application Details page: ${N=SwisEntity;M=DetailsUrl}

Alert triggered at ${N=Alerting;M=AlertTriggerTime;F=DateTime}.

View full object details here: ${N=SwisEntity;M=DetailsUrl}.
View full alert details here: ${N=Alerting;M=AlertDetailsUrl}
Click here to acknowledge the alert: ${N=Alerting;M=AcknowledgeUrl}

Alert name: ${N=Alerting;M=AlertName}
Submit the email action.
Next your way to the last page.
Submit your new alert.